www.mumboracing.com
Crash Proofing
What is the cause of most aviation accidents:
Usually it is because someone does too much too soon, followed very quickly by too little too late.— Steve Wilson, NTSB investigator
Introduction
It's something we don't like to think about too much. Crashing. But sometimes it happens. Mechanical failure, driver error, attempting to avoid someone elses error, pushing that little bit too hard - there are plenty of things that can lead to a crash, and once the trigger has happened, it's too late to be worrying about whether all the right protections are in place. They need to be complete before the car ever turns a wheel in anger.
So, in this article we're not going to be looking at what you can do to avoid having a crash (the doing "too much too soon" from the quote at the top), rather we'll look at what you can do to your racecar in advance to ensure that if you ever do end up in that situation you're not left with the second part of the quote: "too little too late".
It's not possible to make your car "crash proof", but it is possible to apply the maximum amount of thought, effort and preparation to provide yourself the maximum chance of survival, and minimum chance of injury.
Definition
The aviation world are the accepted experts when it comes to crashworthiness. And they define crashworthiness as follows:
The ability of an aircraft and its internal systems to protect occupants from injury in the event of a crash.
Substitute the word aircraft for racecar, and this sounds a lot like something we might want to achieve.
Principles
So, what are the principles and how do they apply to us?
The aviation industry uses an acronym to describe the specific areas for attention when assessing/improving crashworthiness. The acronym is CREEP.
C - Container
R - Restraint
E - Energy absorption
E - Environment (local)
P - Postcrash factors
That's great, but how do these apply to us?
Container
The container in an aircraft is the cockpit and cabin area - the space where people go. For us, it's the cockpit, or passenger cell.
Ideally the container will form a protective shell around the occupant(s) in the event of a crash. It should be strong, and protect as many sides as possible. The container needs to protect the occupant from external objects penetrating the skin, and also from other parts of the vehicle entering the cabin.
To improve the integrity of the container, racecars are often seam welded, strengthening panels may be added to parts of the skin. The rollcage is a very important feature of our container. Other things you can do is race with your windows up, and fit and use window nets. Some racecars feature side impact protection, in the form of carbon fibre slabs mounted to the side of the driver.
Restraint
Obviously restraint refers to any system or device which keeps the occupant(s) in position. This is desirable to avoid the occupant contacting parts of the inside of the container, or being ejected altogether.
In a racecar, the restraint must be strong. The stronger and wider the webbing of your multi-point harness, the more chance the harness has of keeping you in place. One sometimes overlooked part of the restraint is its mounting - the mounts must be strong, and not allow the restraint to come loose under impact conditions.
The basic lap-strap stops the midsection from moving forward. Shoulder straps stop the upper body from moving forward (or to the side), and crotch straps reduce the chance of 'submarining'.
A HANS device can be considered as an addition to the restraint system, and stops the head and neck being overextended, and greatly reduces the likelihood of neck injuries.
Window nets are another aspect of restraint (and crossover to the container section). Some cars also feature small straps connected to the arms to minimise the chance of flailing (sometimes seen in use in Sprintcars).
Energy Absorption
This refers to the ability of the vehicle to absorb some of the impact energy to reduce the impact loading on the occupant. The more absorption, the more time is available for deceleration, and the less force is applied to the occupant.
This can be seen vividly in the video above. The 'crumple-zones' of the late model car provide more time for the deceleration to occur, and the forces on the occupant are greatly reduced.
In our racecar, there is not a lot that can be done to improve energy absorption, it is inherited from the vehicle manufacturer. We can ensure that our car is correctly assembled and that all parts are in good repair (no rust!).
Local Environment
This means the area in the cabin around the occupants. Obviously you would not install sharp knives pointing at the driver so in an impact he has nowhere to go but to the knives.
Crashworthiness looks at all objects within reach of the occupant in a crash scenario - with restraints at full extension, and extremities (arms and legs) flailing. Sharp edges, switches, steering wheels are some common local environment hazards.
Have a good look at the cockpit of your car, and see if there is anything you would be happy to slam your hand against at full force, anywhere in reach of your arms, legs and head. If you find something, look at if it may be able to be relocated or 'de-lethalized' - put a foam cover over it, or otherwise reduce the consequence of an impact.
Postcrash Factors
This is what happens to the vehicle in the aftermath of a crash. Does fuel keep pumping through the fuel lines? Do the petrol/oil/lubricant tanks rupture and leak? Common postcrash hazards are: fire, fumes, fuel, oil and water.
The ideal scenario is to control these hazards at their source. In a racecar, a crash resistant fuel cell is much less likely to allow fuel out to start a fire. An automatic fuel pump cutoff will stop pumping fuel to the hot engine bay. A manual isolation switch will stop everything (if someone is able to activate it). Second best is dealing with the subsequent problem: extinguishing the fire, wearing flameproof nomex clothing etc.
There are many things we can do to help with postcrash factors including: fitting the best systems - fuel cell, fuel pump cutoff, leakproof catch tanks and reservoirs; wearing the best safety gear - nomex overalls and underwear; providing first aid equipment - serviceable fire extinguisher and manual cutoff switch.
The final part of postcrash factors is getting safely out of the vehicle. The restraint system must be easily released, and the doors must be easy to open and egress through. You should regularly familiarise yourself with escaping your racecar - try to imagine it is on fire, close your eyes, and practice getting out. It may save your life.
Conclusion
So, hopefully we never need to use this stuff. But, if we ever do, time spent thinking about, and addressing it now, may be enough to save your life, and you won't be relying on 'too little too late'.
Biased Opinion
Racing is about getting the maximum speed out of the car to achieve the minimum laptime. In circuit racing, we go around corners, and to ensure we can go as fast as possible for as long as possible, and still negotiate the next corner, braking is critical.
To achieve optimum braking, we need to apply the right amount of braking force through each of our tyres. Too much force and the tyre will lock, reducing braking efficiency, too little force and we will either not make the corner, or need to commence braking too early. This situation is complicated further by the transfer of weight as the braking force is applied, giving our front tyres more grip than the rear tyres, and offering more braking potential through the front tyres than the rears.
Most race cars will feature some method of brake bias adjustment to vary the ratio between front and rear braking force (some very advanced setups, previously seen in F1, dynamically varied the force side-to-side aswell, but that is well beyond the scope of this article!). This article will outline two methods of adjusting brake bias to achieve that optimum ratio.
Systems:
There are two main types of bias adjustment. The most common, and preferred method is to adjust a balance bar within the pivot of the brake pedal, varying the ratio of force between the front and rear brake master cylinders.

A small knob is usually mounted on the dashboard. Rotating the knob rotates the cable, which in turn rotates the threaded rod. As the threaded rod rotates, the pivot point moves toward the front or rear master cylinder, varying the proportion of force applied.
The alternative system, which offers a slightly more coarse adjustment (and is somewhat more prone to hysteresis and unreliability) is the proportioning valve. Usually mounted in the rear brake line, the valve limits the flow of fluid between the rear master cylinder and the rear brakes, effectively adjusting the ratio of front to rear force by reducing the force at the rear.

There are two main variants - the lever type, which offers fast, coarse adjustment, and the knob type, which offers slower, more fine adjustment.
Techniques:
There are two techniques to setting the brake bias. Both can be used with either of the systems outlined above.
Method #1
The first method can be done in the workshop, before even arriving at the circuit. This is a 'ballpark' type setting, and should usually be refined by using the second method on-track. If done correctly though, the initial setting will usually be within a turn or so of the ideal setting.
Fit wheels and tyres to the racecar, ensure the brakes are free of oil, corrosion or any other friction reducing problems. Place the car on stands and have a helper in the driver's seat. The helper must be reliable and able to maintain a set brake pedal pressure.
Position yourself so you can rotate the front wheels by hand. Start rotating the wheel (slowly is fine) by hand, and have the helper slowly press the brake pedal. Once your helper reaches a pedal pressure where you can no longer rotate the front wheels, have him/her hold that pedal pressure. Move to the rear wheels and attempt to rotate by hand. If the bias is set correctly, you should just barely be able to rotate the rear wheels.
If you can rotate the rear wheels freely, adjust the bias towards the rear and repeat the test. If you are unable to rotate the rear wheels, adjust the bias towards the front and repeat the test. Continue repeating until you can just barely rotate the rear wheels when the front wheels are locked.
Method #2
This method is more accurate, but requires excellent driver feel, and preferably an outside observer. It also requires a racetrack or other safe operating area.
Warm the car up, and drive at moderate pace toward the test (braking) area. Apply the brakes normally, until either the front or rear wheels are felt to lock. Use the feedback of the outside observer to confirm which wheels locked (if all four locked, you need to repeat the test, or you bias may already be perfect). Adjust the bias away from the end that locked. Repeat the test. Repeat until under normal braking, as force is increased, all four wheels lock at the same time. It is important to note that 'panic' or unusually rapid braking is of no benefit for this test, as the car needs to be in a normal braking state (stabilised with weight transfer at or near where it will be under normal, race braking).
Other Notes:
Further fine tuning should be done under practice/race conditions. It can sometimes be beneficial to have a slight bias to one end or the other, for example and understeering car may respond well to a slightly more rearward bias, effectively overloading the rear tyres and allowing some rotation of the car on the brakes to compensate for the lack of front grip ('backing it in'). A slight bias towards the front is a more stable, and beginner driver friendly state, as it gives more warning that the limit is being reached.
Further Reading:
Read Carroll Smith's books. Tune to Win and Drive to Win are probably most relevant to this topic, but all of his books are invaluable.
Disclaimer:
Remember, you are responsible for the consequences of any changes you make, and any adverse outcomes. This article is provided for reference only. Neither iRace or the author offer any warranty or any liability for any damage or injury caused by tweaking any racecar.
To achieve optimum braking, we need to apply the right amount of braking force through each of our tyres. Too much force and the tyre will lock, reducing braking efficiency, too little force and we will either not make the corner, or need to commence braking too early. This situation is complicated further by the transfer of weight as the braking force is applied, giving our front tyres more grip than the rear tyres, and offering more braking potential through the front tyres than the rears.
Most race cars will feature some method of brake bias adjustment to vary the ratio between front and rear braking force (some very advanced setups, previously seen in F1, dynamically varied the force side-to-side aswell, but that is well beyond the scope of this article!). This article will outline two methods of adjusting brake bias to achieve that optimum ratio.
The goal is always when braking at maximum capacity that an increase in braking force will cause the front and rear tyres to lock simultaneously.
Systems:
There are two main types of bias adjustment. The most common, and preferred method is to adjust a balance bar within the pivot of the brake pedal, varying the ratio of force between the front and rear brake master cylinders.
A small knob is usually mounted on the dashboard. Rotating the knob rotates the cable, which in turn rotates the threaded rod. As the threaded rod rotates, the pivot point moves toward the front or rear master cylinder, varying the proportion of force applied.
The alternative system, which offers a slightly more coarse adjustment (and is somewhat more prone to hysteresis and unreliability) is the proportioning valve. Usually mounted in the rear brake line, the valve limits the flow of fluid between the rear master cylinder and the rear brakes, effectively adjusting the ratio of front to rear force by reducing the force at the rear.
There are two main variants - the lever type, which offers fast, coarse adjustment, and the knob type, which offers slower, more fine adjustment.
Techniques:
There are two techniques to setting the brake bias. Both can be used with either of the systems outlined above.
Method #1
The first method can be done in the workshop, before even arriving at the circuit. This is a 'ballpark' type setting, and should usually be refined by using the second method on-track. If done correctly though, the initial setting will usually be within a turn or so of the ideal setting.
Fit wheels and tyres to the racecar, ensure the brakes are free of oil, corrosion or any other friction reducing problems. Place the car on stands and have a helper in the driver's seat. The helper must be reliable and able to maintain a set brake pedal pressure.
Position yourself so you can rotate the front wheels by hand. Start rotating the wheel (slowly is fine) by hand, and have the helper slowly press the brake pedal. Once your helper reaches a pedal pressure where you can no longer rotate the front wheels, have him/her hold that pedal pressure. Move to the rear wheels and attempt to rotate by hand. If the bias is set correctly, you should just barely be able to rotate the rear wheels.
If you can rotate the rear wheels freely, adjust the bias towards the rear and repeat the test. If you are unable to rotate the rear wheels, adjust the bias towards the front and repeat the test. Continue repeating until you can just barely rotate the rear wheels when the front wheels are locked.
Method #2
This method is more accurate, but requires excellent driver feel, and preferably an outside observer. It also requires a racetrack or other safe operating area.
Warm the car up, and drive at moderate pace toward the test (braking) area. Apply the brakes normally, until either the front or rear wheels are felt to lock. Use the feedback of the outside observer to confirm which wheels locked (if all four locked, you need to repeat the test, or you bias may already be perfect). Adjust the bias away from the end that locked. Repeat the test. Repeat until under normal braking, as force is increased, all four wheels lock at the same time. It is important to note that 'panic' or unusually rapid braking is of no benefit for this test, as the car needs to be in a normal braking state (stabilised with weight transfer at or near where it will be under normal, race braking).
Other Notes:
Further fine tuning should be done under practice/race conditions. It can sometimes be beneficial to have a slight bias to one end or the other, for example and understeering car may respond well to a slightly more rearward bias, effectively overloading the rear tyres and allowing some rotation of the car on the brakes to compensate for the lack of front grip ('backing it in'). A slight bias towards the front is a more stable, and beginner driver friendly state, as it gives more warning that the limit is being reached.
Further Reading:
Read Carroll Smith's books. Tune to Win and Drive to Win are probably most relevant to this topic, but all of his books are invaluable.
Disclaimer:
Remember, you are responsible for the consequences of any changes you make, and any adverse outcomes. This article is provided for reference only. Neither iRace or the author offer any warranty or any liability for any damage or injury caused by tweaking any racecar.
Pyro Maniac
Motorsport is all about tyres. Driving a racecar is all about getting the most out of the tyres, and racecar setup concentrates on making sure the tyres deliver maximum grip. As most racers know, the right suspension settings are vital to ensuring the racecar performs at full potential.
But for a car that doesn't come with a specification sheet outlining the optimum settings, how do we figure out what settings to use? Many racers will go with their gut feeling, or perhaps use settings that have worked on a previous car, or they may be able to copy the settings from a similar car. These are all workable methods, but there is a more scientific method to establish the ideal settings. The method involves the use of a tyre pyrometer, and a rough outline of the technique will be the subject of this article.
Spring rates, shock absorber settings and baseline suspension geometry will not be covered in this article. Baseline geometry is usually determined at the vehicle design stage, and may be limited by packaging and construction issues. Ideal spring rates will vary depending on sprung weight, vehicle corner weight, the bump frequency of circuits visited and finally the front-rear balance desired. Shock absorber settings are a specialised area beyond the scope of this article. More information on these topics is available in Allan Staniforth's excellent book: Competition Car Suspension.
This article will look at how we can use a tyre pyrometer to determine the optimum wheel alignment settings (camber, toe, caster) and optimum tyre pressures.
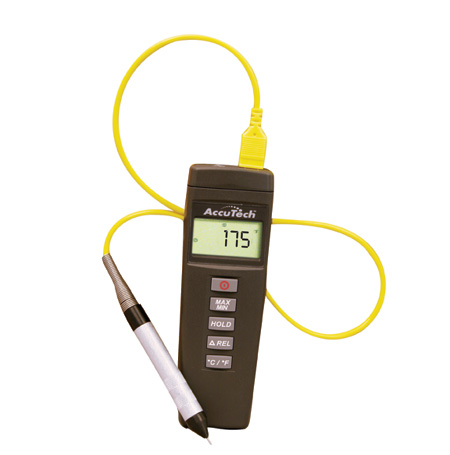 A basic probe-type pyrometer is the best kind. There are infrared pyrometers available, but they measure the surface temperature, not the core temperature that we're actually looking for. A decent probe-type pyrometer should cost around $200. There are some available here and here. Make sure you carry spare batteries with you too.
You'll also need a good tyre gauge, plus a pencil and a notepad.
There is some excellent software available from Paul Van Valkenburgh don't be put off by the basic website, the software is very good, and runs on a very basic Palm PDA (available for around $50 from Cash Converters). This software is not a requirement, but can prove to be a timesaver when using the techniques described in this article.
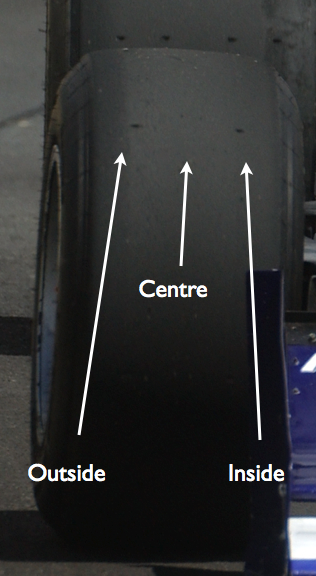
Tyre temperatures give a very good indication of how the tyres are working. Every tyre has an optimum working temperature, where it will deliver maximum grip for the maximum length of time. If a tyre is overworked, it will generally run hotter, it may deliver a little more grip for a short period, but will quickly deteriorate. If a tyre is underworked, it will run cooler. Comparing the temperature of the front tyres to the rears will give an indication of balance, the hotter end is working harder than the cooler end (the driver's feedback should confirm this). We can also get an idea of how well each individual tyre is working by comparing temperatures across the face of the tyre. We look at the temperature near the outside edge of the tread, the centre and near the inside edge. Comparing these temperatures will give us an idea of if our tyre is contacting the circuit in an optimal way - if part of the tyre is too cool, it may not be contacting the bitumen correctly; if part is too hot, it may be taking more than it's fair share of the load.
 What we're after is a picture of how the tyres are working, by measuring their operating temperature. Ideally, we would take this picture at the exact moment the tyres are working their hardest - in the middle of a corner. This is not practical without a very expensive onboard infrared sensor setup (like Formula 1 teams will use during testing), so we're faced with taking the temperatures in the pits. To give ourselves the best picture, we need the tyres to work hard for at least a few laps, and for that work to be sustained for as long as possible before stopping (push the car hard right up until pit entry). Enter the pits safely, and then ensure minimum delay before taking the temperatures (a crew member or two dedicated to taking the temps as soon as the car pulls up is a good idea).
 Take temperatures and pressures on each tyre. To take the temperature the probe should be inserted a millimetre or two into the tread of the tyre in three places across the tread - about 30mm from the outside edge of the working tread (tread that is working on the bitumen will have a 'rough' appearance), in the centre of the tread, and about 30mm from the inside edge of the working tread. Record all figures in a notebook (a sample recording may look something like the note on the right). Work quickly but carefully to ensure the data obtained is as accurate as possible (and so there is minimum cooling time between the readings for each tyre). You should also note on the same page the starting cold tyre pressure from before the car ran on the circuit.
The ideal temperature for any tyre should be available from the tyre supplier or manufacturer (if you obtain this figure, make sure you measure your temps in the same scale - celsius or fahrenheit). If the temperature is not available, you should be able to get a good idea from other competitors, or from comparing your own recorded temperatures with how the car performed or felt. Once you have a target temperature, you can compare your recorded temps.
For our example, we'll assume an optimum of 140 degrees fahrenheit, and 21psi hot pressure.
Recorded temps were as follows:
LF OCI: 120/125/130 RF ICO: 140/135/120
LR OCI: 145/160/145 RR ICO: 145/150/145
To get an average, add up all the temps for the factor you're considering and divide by the number of temps you've added (eg; for front to rear bias, add all the front temps, then divide by 6, add all the rear temps, divide by 6, then you can compare the average front temp with the average rear temp).
From our example we can immediately see that the rear tyres are overall hotter than the front. This car is using it's rear tyres more than it's fronts. It's likely that the car has an overall oversteer balance. This may be influenced by the driver's style (he may be balancing the car on the throttle and/or driving around understeer by provoking oversteer), and could be clarified by the driver's comments. There isn't a massive front-rear differential, so it appears that the overall balance is reasonably close to optimum. (F 128 : R 148 = 20 degrees differential) More than 20 degrees differential may warrant further investigation.
Looking at the diagonal temperatures, we can see that the LEFT REAR and RIGHT FRONT are the hottest tyres at their respective ends. This could indicate a corner weight issue - generally if the corner weights are out, diagonal temps will be effected. In this case it could be that there is not enough weight on the left front and/or right rear. As for the overall balance, the differential is not very large (LF/RR average= 136, LR/RF average= 141). A differential of more than 20 degrees may be worthy of investigation of the corner weights.
Looking at the across tread temperatures for each tyre will give an idea on which part of the tyre is working hardest. To assess camber, we need to look at each tyre individually. We need to have an idea of the existing camber settings because on a tyre where there is a lot of negative camber, the outside edge can cool a little on the run into the pits.
LF: We know this tyre has about 2.5 degrees of negative camber. The temps across the tread look about right - around 5 degrees cooling between the inside and the centre, and another 5 to the outside, is about normal. Camber setting of this wheel is correct.
RF: This tyre has a 20 degree difference between the inside and the outside. The inside is working quite a bit harder than the outside. This tyre should have the negative camber reduced (tyre stood up more vertical). A rough ballpark in this case may be a 0.5 degree change.
LR: The temps on the inside and outside are the same - camber setting of this wheel is correct.
RR: Camber setting is correct.
The highest temperature across the tread will indicate the part of the tyre that is working hardest. If the outside edges are hotter, the pressure is probably too low. If the centre is hotter, the pressure is probably too high. Again, we need to look at each tyre individually.
LF: The average edge temperature (add outside and inside temp and divide by 2) is equal to the centre temp. The tyre pressure is optimum.
RF: Edge average is 5 degrees cooler than the centre. This indicates a pressure that is slightly too high. Consider reducing pressure by 0.5 or 1 psi (subsequent pyrometer readings may be used to fine tune).
LR: This tyre has a much higher centre temp than average edge temp - a fifteen degree differential. This tyre is overinflated. Reduce pressure by 1 to 2 psi.
RR: A little hot in the centre, but this tyre is not far from optimum. Consider reducing pressure by 0.5 psi.
There are other factors to consider when setting the toe. Toe out makes that end of the car less stable (this sounds bad, but can be a good thing, when you consider that being less stable can mean that end of the car will bite into, or steer more positively). Toe in makes that end more stable, but may reduce responsiveness. Any kind of toe either side of zero (wheels perfectly parallel) will generate scrub on the tyres (as they rotate against the bitumen, they are pulling a little in the direction of the toe, but can't move in that direction as the wheels remain connected to the car). This scrub causes tyre wear, but also helps to keep the tyres at operating temperature on the straights (ready to do their job at the next corner). In our example above, we may consider increasing the toe out - this will help with the steering of the car (the car will want to point into the corners) and also help to increase the average front tyre temps. We need to be very careful about this though - the added 'pointiness' may actually translate to more oversteer on corner entry.
A race car will generally run as much caster as possible, at least on the front suspension. If not, and there is scope for caster adjustment, it should be remembered that caster will contribute to dynamic camber. That is, when steering lock is applied, a car with high caster on the front will increase the amount of dynamic negative camber (the loaded outside wheel will effectively lean into the corner as steering is added). Thing start to get very complicated, but a very high caster setting may be the reason the inside edge of the tyre tread runs very hot.
Measuring the temperature of the tread of your tyres can give you a lot of information about how well the car is working. It can give you a good starting point for what changes might need to be made. Ultimately though, driver feedback is vital. An apprarent anomaly in the readings may be easily explained by the driver.
If you are going to make changes, record everything, including your reasoning for the change (and what the original settings were). This way, if you get confused, you can reset back to where you started.
And remember, you are responsible for the consequences of any changes you make, and any adverse outcomes. This article is provided for reference only. Neither iRace or the author offer any warranty or any liability for any damage or injury caused by tweaking any racecar.
Drive to Win - Carroll Smith
Tune to Win - Carroll Smith
Competition Car Suspension - Allan Staniforth
But for a car that doesn't come with a specification sheet outlining the optimum settings, how do we figure out what settings to use? Many racers will go with their gut feeling, or perhaps use settings that have worked on a previous car, or they may be able to copy the settings from a similar car. These are all workable methods, but there is a more scientific method to establish the ideal settings. The method involves the use of a tyre pyrometer, and a rough outline of the technique will be the subject of this article.
Spring rates, shock absorber settings and baseline suspension geometry will not be covered in this article. Baseline geometry is usually determined at the vehicle design stage, and may be limited by packaging and construction issues. Ideal spring rates will vary depending on sprung weight, vehicle corner weight, the bump frequency of circuits visited and finally the front-rear balance desired. Shock absorber settings are a specialised area beyond the scope of this article. More information on these topics is available in Allan Staniforth's excellent book: Competition Car Suspension.
This article will look at how we can use a tyre pyrometer to determine the optimum wheel alignment settings (camber, toe, caster) and optimum tyre pressures.
Equipment Required
A basic probe-type pyrometer is the best kind. There are infrared pyrometers available, but they measure the surface temperature, not the core temperature that we're actually looking for. A decent probe-type pyrometer should cost around $200. There are some available here and here. Make sure you carry spare batteries with you too.You'll also need a good tyre gauge, plus a pencil and a notepad.
There is some excellent software available from Paul Van Valkenburgh don't be put off by the basic website, the software is very good, and runs on a very basic Palm PDA (available for around $50 from Cash Converters). This software is not a requirement, but can prove to be a timesaver when using the techniques described in this article.
Background Concepts
Tyre temperatures give a very good indication of how the tyres are working. Every tyre has an optimum working temperature, where it will deliver maximum grip for the maximum length of time. If a tyre is overworked, it will generally run hotter, it may deliver a little more grip for a short period, but will quickly deteriorate. If a tyre is underworked, it will run cooler. Comparing the temperature of the front tyres to the rears will give an indication of balance, the hotter end is working harder than the cooler end (the driver's feedback should confirm this). We can also get an idea of how well each individual tyre is working by comparing temperatures across the face of the tyre. We look at the temperature near the outside edge of the tread, the centre and near the inside edge. Comparing these temperatures will give us an idea of if our tyre is contacting the circuit in an optimal way - if part of the tyre is too cool, it may not be contacting the bitumen correctly; if part is too hot, it may be taking more than it's fair share of the load.
Measuring Tyre Temperatures
What we're after is a picture of how the tyres are working, by measuring their operating temperature. Ideally, we would take this picture at the exact moment the tyres are working their hardest - in the middle of a corner. This is not practical without a very expensive onboard infrared sensor setup (like Formula 1 teams will use during testing), so we're faced with taking the temperatures in the pits. To give ourselves the best picture, we need the tyres to work hard for at least a few laps, and for that work to be sustained for as long as possible before stopping (push the car hard right up until pit entry). Enter the pits safely, and then ensure minimum delay before taking the temperatures (a crew member or two dedicated to taking the temps as soon as the car pulls up is a good idea).Take temperatures and pressures on each tyre. To take the temperature the probe should be inserted a millimetre or two into the tread of the tyre in three places across the tread - about 30mm from the outside edge of the working tread (tread that is working on the bitumen will have a 'rough' appearance), in the centre of the tread, and about 30mm from the inside edge of the working tread. Record all figures in a notebook (a sample recording may look something like the note on the right). Work quickly but carefully to ensure the data obtained is as accurate as possible (and so there is minimum cooling time between the readings for each tyre). You should also note on the same page the starting cold tyre pressure from before the car ran on the circuit.Interpreting Tyre Temperatures
The ideal temperature for any tyre should be available from the tyre supplier or manufacturer (if you obtain this figure, make sure you measure your temps in the same scale - celsius or fahrenheit). If the temperature is not available, you should be able to get a good idea from other competitors, or from comparing your own recorded temperatures with how the car performed or felt. Once you have a target temperature, you can compare your recorded temps.
For our example, we'll assume an optimum of 140 degrees fahrenheit, and 21psi hot pressure.
Recorded temps were as follows:
LF OCI: 120/125/130 RF ICO: 140/135/120
LR OCI: 145/160/145 RR ICO: 145/150/145
To get an average, add up all the temps for the factor you're considering and divide by the number of temps you've added (eg; for front to rear bias, add all the front temps, then divide by 6, add all the rear temps, divide by 6, then you can compare the average front temp with the average rear temp).
OVERALL BALANCE
From our example we can immediately see that the rear tyres are overall hotter than the front. This car is using it's rear tyres more than it's fronts. It's likely that the car has an overall oversteer balance. This may be influenced by the driver's style (he may be balancing the car on the throttle and/or driving around understeer by provoking oversteer), and could be clarified by the driver's comments. There isn't a massive front-rear differential, so it appears that the overall balance is reasonably close to optimum. (F 128 : R 148 = 20 degrees differential) More than 20 degrees differential may warrant further investigation.
CORNER WEIGHTS
Looking at the diagonal temperatures, we can see that the LEFT REAR and RIGHT FRONT are the hottest tyres at their respective ends. This could indicate a corner weight issue - generally if the corner weights are out, diagonal temps will be effected. In this case it could be that there is not enough weight on the left front and/or right rear. As for the overall balance, the differential is not very large (LF/RR average= 136, LR/RF average= 141). A differential of more than 20 degrees may be worthy of investigation of the corner weights.
CAMBER (Static)
Looking at the across tread temperatures for each tyre will give an idea on which part of the tyre is working hardest. To assess camber, we need to look at each tyre individually. We need to have an idea of the existing camber settings because on a tyre where there is a lot of negative camber, the outside edge can cool a little on the run into the pits.
LF: We know this tyre has about 2.5 degrees of negative camber. The temps across the tread look about right - around 5 degrees cooling between the inside and the centre, and another 5 to the outside, is about normal. Camber setting of this wheel is correct.
RF: This tyre has a 20 degree difference between the inside and the outside. The inside is working quite a bit harder than the outside. This tyre should have the negative camber reduced (tyre stood up more vertical). A rough ballpark in this case may be a 0.5 degree change.
LR: The temps on the inside and outside are the same - camber setting of this wheel is correct.
RR: Camber setting is correct.
TYRE PRESSURES
The highest temperature across the tread will indicate the part of the tyre that is working hardest. If the outside edges are hotter, the pressure is probably too low. If the centre is hotter, the pressure is probably too high. Again, we need to look at each tyre individually.
LF: The average edge temperature (add outside and inside temp and divide by 2) is equal to the centre temp. The tyre pressure is optimum.
RF: Edge average is 5 degrees cooler than the centre. This indicates a pressure that is slightly too high. Consider reducing pressure by 0.5 or 1 psi (subsequent pyrometer readings may be used to fine tune).
LR: This tyre has a much higher centre temp than average edge temp - a fifteen degree differential. This tyre is overinflated. Reduce pressure by 1 to 2 psi.
RR: A little hot in the centre, but this tyre is not far from optimum. Consider reducing pressure by 0.5 psi.
TOE SETTINGS
There are other factors to consider when setting the toe. Toe out makes that end of the car less stable (this sounds bad, but can be a good thing, when you consider that being less stable can mean that end of the car will bite into, or steer more positively). Toe in makes that end more stable, but may reduce responsiveness. Any kind of toe either side of zero (wheels perfectly parallel) will generate scrub on the tyres (as they rotate against the bitumen, they are pulling a little in the direction of the toe, but can't move in that direction as the wheels remain connected to the car). This scrub causes tyre wear, but also helps to keep the tyres at operating temperature on the straights (ready to do their job at the next corner). In our example above, we may consider increasing the toe out - this will help with the steering of the car (the car will want to point into the corners) and also help to increase the average front tyre temps. We need to be very careful about this though - the added 'pointiness' may actually translate to more oversteer on corner entry.
CASTER
A race car will generally run as much caster as possible, at least on the front suspension. If not, and there is scope for caster adjustment, it should be remembered that caster will contribute to dynamic camber. That is, when steering lock is applied, a car with high caster on the front will increase the amount of dynamic negative camber (the loaded outside wheel will effectively lean into the corner as steering is added). Thing start to get very complicated, but a very high caster setting may be the reason the inside edge of the tyre tread runs very hot.
Final Word
Measuring the temperature of the tread of your tyres can give you a lot of information about how well the car is working. It can give you a good starting point for what changes might need to be made. Ultimately though, driver feedback is vital. An apprarent anomaly in the readings may be easily explained by the driver.
If you are going to make changes, record everything, including your reasoning for the change (and what the original settings were). This way, if you get confused, you can reset back to where you started.
And remember, you are responsible for the consequences of any changes you make, and any adverse outcomes. This article is provided for reference only. Neither iRace or the author offer any warranty or any liability for any damage or injury caused by tweaking any racecar.
Further Reading
Drive to Win - Carroll Smith
Tune to Win - Carroll Smith
Competition Car Suspension - Allan Staniforth
How To Be Interviewed
 Being interviewed isn't something that happens everyday. It's not something most of us have much chance to practice, so it's quite easy to be unprepared and unsure of how best to handle yourself during an interview. It's very easy to end up seeming vague and incoherent in an interview, which nobody wants, and which doesn't impress too many sponsors.
Rather than go into too much depth, this article will just cover five key things to keep in mind in the few seconds you have to prepare for your next interview (when you win your next race!).
1. Personal Presentation.
Most of us are very busy on a race weekend, in between driving and keeping the racecar running, quite often there isn't much time to shave or brush your hair. But this is the first thing people see when watching an interview. So, make that extra effort to have a shave on race morning (unless you have a beard of course!), and take a second to brush your hair (or even better, wear a sponsor's cap!). Also do your best to have a clean driving suit, and DO UP THE COLLAR!
2. Think About the Background.
For some interviews you'll get to have some input into where it happens. If you do, make sure you select a suitable area - preferably in front of your car so either your name or sponsor's logo are clearly visible. Try to avoid busy or distracting backgrounds - nobody will be listening to what you're saying if there is a kid picking their nose in the background.
3. Take a Second to Gather Your Thoughts.
If you have the chance, think about what message you'd like to get through the night before the meeting, or in the morning when you're getting everything ready. If you don't get that chance, and you are on the spot, ask the interviewing team to give you 30 seconds to have a think about what things you'd like to mention. Things at the top of the list should be Sponsors, People Who Have Helped, Worthy Competitors, What You're Hoping to Achieve.
4. Repeat the Question in Your Answer.
This may not make much sense at the time, but will make more sense when watching the interview. Quite often TV producers don't bother with including the interviewer's question - they simply edit to show only what you've said. Sometimes this means your comment ends has no context or in the worst case makes no sense. You can avoid this problem by using a part of the question in your answer. This little trick also gives you a couple more precious seconds to think carefully about your answer. For example, if an interviewer asks: "So, what are your plans for the remainder of the season?", instead of answering "To win!", you could say: "For the rest of the season, I'm aiming to produce consistent performances, and take as many wins as possible." Which one sounds more like an F1 driver to you?
5. Don't Stare at the Camera.
It's ok to know the camera is there, but don't stare down the lens. Look at the interviewer when you answer the questions. Also, don't use the interviewer's name in your answers. As in the point above, there is a fair chance the question won't even be shown on TV, so the viewer at home won't understand who you're referring to. (It's fine to use the interviewer's name off camera if you know it.)
So, that's it. Just a few easy to follow guidelines you can put into practice during your next interview!